Analysis of two encryption algorithms of the Lazarus group
In this blog, I will analyze the encryption capabilities of a malware sample attributed to the North Korean APT group known as Hidden Cobra, or Lazarus.

Introduction
In this blog, we will analyze the encryption capabilities of a malware sample attributed to the North Korean APT group known as Hidden Cobra. In particular, we will focus on its encryption capabilities, and we will analyze in deep the two encryption algorithms used by this sample.
The (sha2-256) hash of the sample is
bdff852398f174e9eef1db1c2d3fefdda25fe0ea90a40a2e06e51b5c0ebd69eb.
This is a well known sample and it is indeed possible to find reports online. Reading these reports after analyzing the sample was useful to double check my findings and to get a better idea of the goals of the whole campaign.
The most comprehensive report about this sample is from CISA. Reading this report, we learn that FBI, CISA, and the Department of Treasury attribute this malware campaign to the Lazarus group (aka Hidden Cobra).
Authors also state that this sample is part of a trojanized application named AppleJeus, that pretends to be a legitimate trading application and whose goal is to steal cryptocurrencies to the victims. The sample makes use of a valid certificate, associated to the domain celasllc[.]com (we’ll encounter this domain later).
Also, the authors mention the two encryption algorithms that we discuss later: the first one is a simple XOR-based encryption algorithm while the second one is a custom implementation of the RC4 algorithm.
In this blog post instead the authors track the evolution of the AppleJeus malware, highlighting its characteristics trough seven different versions.
Analysis of the sample
I will start with a basic static analysis of the PE header and then I will proceed with an advanced static analysis using IDA Pro. I will show only relevant parts and I will alternate between static and dynamic analysis with the debugger when this will help to clarify concepts.
Opening the file with CFF Explorer, we see that this is a valid PE executable. The sample was written in C++, as we can see from the Compiler section. It is a 32 bit sample
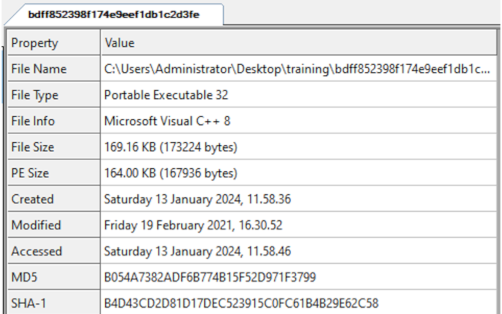
Taking a look at the Characteristics, we see that it is an executable file, not a DLL.
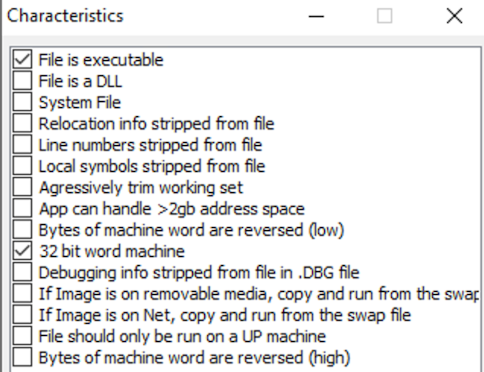
The sample is a GUI application (not a CLI app).

Let’s take a look at the sections now: we can find the standard sections, nothing strange is present. The sample is not packed with UPX (otherwise a UPX section would show up here) and we can notice that for each section, the virtual size is very close to the raw size.

The sample does not seem to be packed. To have further confirmation we take a look at the entropy of each section: all sections have low entropy indeed, with the only exception of the .text section, where entropy is approximately 6.5. If encrypted data or instructions are present, we expect them to be in this section.

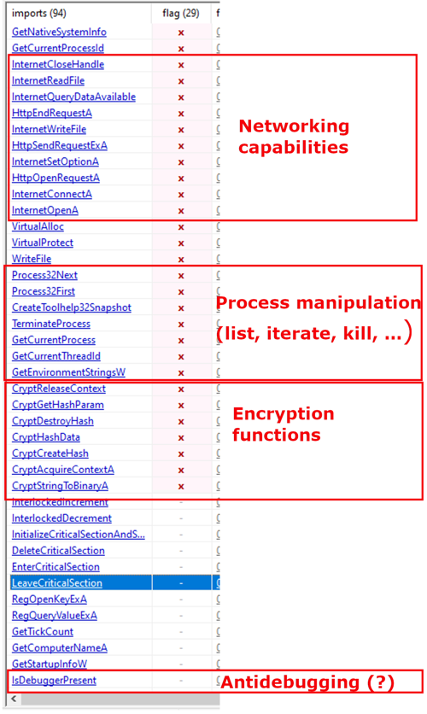
Let’s take a look at the imported libraries.
There are many imported functions, which indicates that functions are not resolved dynamically.
If we make some raw groupings, just to get an idea at first glance of sample capabilities, we can see that there are:
- functions for HTTP communication, maybe used to contact the C2 server;
- functions used to get a list of current processes (GetToolhelp32Snapshot) and to iterate among such processes (and possibly to kill them);
- functions that deal with encryption (Crypt…).
There are other interesting functions imported, for instance functions to get information about whether or not the system is run inside the WoW64 subsystem (this is indeed a 32 bit sample, that can be run on a 64 bit system) or functions used to check the presence of a debugger.
However, I would’t go deeper with the analysis here: better check later in IDA Pro which ones are actually used and how.
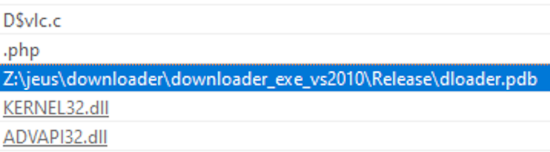
Looking at plain strings found inside the file, we can see a hardcoded path that can represent a good host-based indicator: Z:\jeus\downloader\downloader_exe_vs2010\Release\dloader.pdb
Program database (PDB) is a file format for storing debugging information about a program. They are commonly associated with programs written in C or C++ and are used in Microsoft Visual Studio.
This may tell us that malware author developed this sample in C++ using Visual Studio. The fact that the hardcoded path is left in the executable may be a mistake made by malware authors, who did not sanitize properly the sample before delivering it.
Let's start the analysis with IDA Pro.
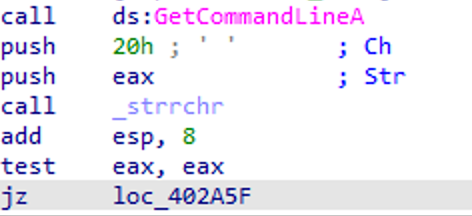
The first thing that catches my attention is the invokation of GetCommandLineA to retrieve the command-line string for the current process.
After that, the sample pushes onto the stack the hex character 20 (corresponding to the blank space character) and the command-line string and then calls _strrchr.
This function returns a pointer to the last occurrence of the provided character into the command-line string, if any. If such character is not found in the command-line string, then the function returns NULL and the sample simply jumps to loc_402A5F and terminates the execution.
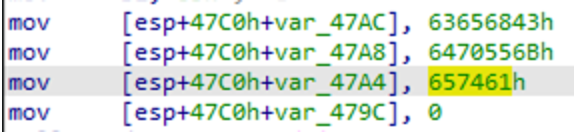
Then next instructions check if the characters after the blank space in the command-line string are the following ones: CheckUpdate
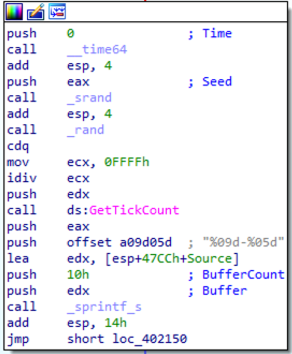
If that is the case the execution continues (the tool was run with the correct parameter) and the sample calls GetTickCount to compute
the number of milliseconds since the system is running.
The next interesting function is SUB_401000, where the sample retrieves information about the current system.
This function invokes CreateToolhelp32Snapshot passing dwFlags = 2 as parameter, which corresponds to TH32CS_SNAPPROCESS, to generate a
snapshot of the system that includes all processes in the system.
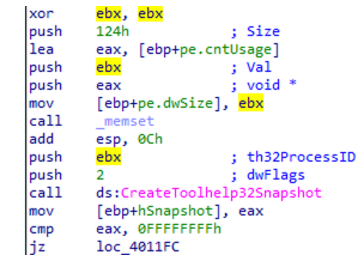
If the function executed successfully, a handle to the created snapshot is returned. Then, Process32First() is called to retrieve information about the first process inside the snapshot.
To do this, the PROCESSENTRY32 structure is initialized and passed to Process32First(), together with the handle to the snapshot
retrieved from CreateToolhelp32Snapshot().
At this point the sample iterates over all the processes in the sample and writes the name of each process found into memory. For instance, the first process name that is written to memory is
[System Process]:

After the process name is written to memory, Process32Next() is called to get the next process in the snapshot. These operations are repeated inside a loop until all processes have been scanned.
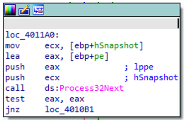
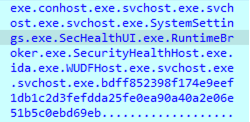
When the loop ends, the sample has dumped all process names, included itself ( bdff852398f174e9eef1db1c2d3fefdda25fe0ea90a40a2e06e51b5c0ebd69eb ):
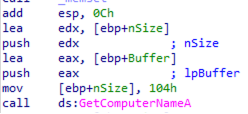
The second thing that the sample retrieves and writes to memory, after the processes names, is the NETBIOS name of the computer:

Finally, the third thing that the sample retrieves are some registry values.
Indeed, RegOpenKeyExA is called to read (samDesired is 20119h, which means read access) the registry key HKEY_LOCAL_MACHINE\\SOFTWARE\\Microsoft\\Windows NT\\CurrentVersion:
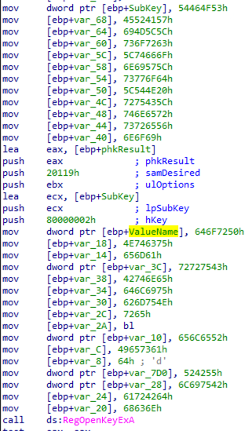
At this point, five strings are created to query five registry values:
- ValueName is assigned the hardcoded string ProductName
- Var_3C is assigned the hardcoded string CurrentBuildNumber
- Var_10 is assigned the hardcoded string ReleaseId
- Var_7D0 is assigned the hardcoded string UBR
- Var_28 is assigned the hardcoded string BuildBranch
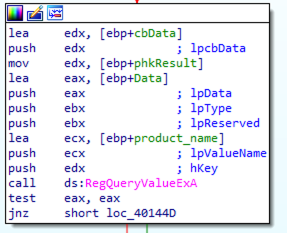
Just to show an example, here it is an iteration of the sample querying the registry value ProductName and storing it in memory.
The retrieved value is Windows 10 Pro. This value is written at the address contained in eax,
right after the process name and the computer name just restrieved. Also the other registry values will be added here:

Encryption #1: XOR-based
The next interesting functionality is the first encryption algorithm:
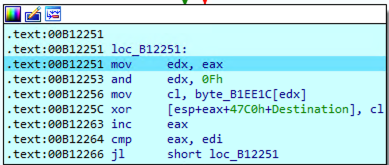
EAX is initially set to zero and incremented until it reaches the value of EDI, which holds the number of bytes previously
written by the sample (process names, hostname and registry values). The encryption is done here,
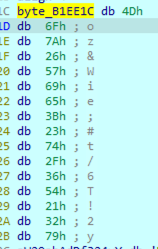
and the key that is used is the one specified at byte_B1EE1C: Moz&Wie;#t/6T!2y
The instruction
AND EDX, 0Fh
Is used to pick a character from this encryption key, in a round robin fashion.
Indeed, since the maximum value that can be returned by this operation is 15, the result is this one:
- at the first iteration we pick the first char of the key (with index 0)
- at the second iteration we pick the second char of the key (with index 1)
- …
- at the sixteenth iteration we pick the sixteenth char of the key (with index 15)
- at the seventeenth iteration we pick the first char of the key (with index 0)
and so on, wrapping around every time we hit a multiple of 16.
The char is then put into cl, and the encryption is a simple XOR between this character and the pointed character of the plaintext.
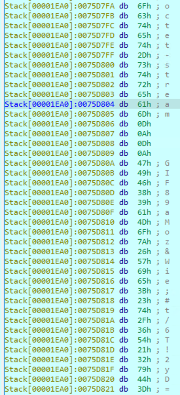
For instance: if the sample has to encrypt the first w of the wininit.exe string, and EAX = 0x2D, this means that:
- the encryption character is the 14th, indeed 0x2D and 0x0F = 0x0D = 13
- This encryption character corresponds to !
- The XOR between w and ! is: 01110111 XOR 00100001 = 01010110. This corresponds to 0x56 or V in ASCII
- We can check that the sample performed the very same conversion, turning the original w character into V


This encryption is invertible, since:
- we know the key
- we know from which character of the key it started (the first one)
- we know that it advances the chars of the key one by one, wrapping up every 16 chars
- we know that XOR operation is invertible
Communication with C2 Server
The next interesting thing is the communication with the command-and-control server.
The sample communicates with the server using Microsoft APIs InternetOpenA,
InternetConnectA and HttpOpenRequestA.
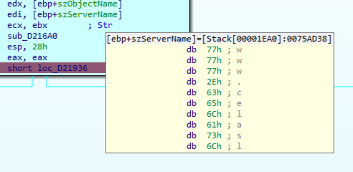
The URL of the C2 server is www.celasllc.com. In particular, the sample tries to access
the resource www.celasllc.com/checkupdate.php, as we can see from the the following screenshot, where:
- [ebp+szObjectName] holds the string /checkupdate.php
- [ebp+szServerName] holds the string www.celasllc.com
The Header of the HTTP request that I observed is the following:
Accept: image/gif, image/x-xbitmap, image/jpeg, image/pjpeg, application/x-shockwave-flash, */
Accept:text/html, application/xhtml+xml, */*
User-Agent: Mozilla/5.0 (compatible; MSIE 10.0; Windows NT 6.1; Trident/6.0)
Host: www.celasllc.com
Connection:Keep-Alive
Accept-Encoding:gzip, deflate
Content-type: multipart/form-data;boundary=jeus
Content-length: 2301
Note the special separator (boundary=jeus) and the fact that the sample is pretending to send a GIF file.
Indeed, the sample refers to the transferred data as if they were an image file named temp.gif.
Finally, for what concerns the content sent to the C2 server, the sample sends the string "GIF89a" (image header),
followed by the encryption key “Moz&Wie;#t/6T!2y," and the encrypted content previously computed.
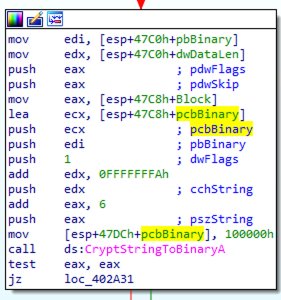
After that, if the sample receives a successful response from the C2 server, it calls CryptStringToBinaryA with dwflags equal to 1
(corresponding to CRYPT_STRING_BASE64) to decode the base64-encoded string from the C2 server.
Then, RC4 algorithm is used to decode the data received from the C2 server.
Encryption #2: RC4
RC4 is a stream cipher encryption algorithm, that is a symmetric key cipher where plaintext digits are combined with a pseudorandom cipher
digit stream (keystream). In a stream cipher, each plaintext digit is encrypted one at a time with the corresponding digit of the keystream,
to give a digit of the ciphertext stream (Wikipedia).
To generate the keystream, the cipher makes use of a secret internal state which consists of two parts:
1. A permutation of all 256 possible bytes (denoted "S" below).
2. Two 8-bit index-pointers (denoted "i" and "j").
The permutation is initialized with a variable-length key, typically between 40 and 2048 bits, using the key-scheduling algorithm (KSA).
Once this has been completed, the stream of bits is generated using the pseudo-random generation algorithm (PRGA).
So, there are two main components involved in this algorithm: the Key-Scheduling algorithm, used to initializa the permutation in the array S, and
the Pseudo-random generation algorithm (PRGA), which outputs a byte of the keystream at each iteration.
Now we will take a look at the pseudocode of these two algorithms and we will try to match them with the reversed code from IDA.
Key-scheduling algorithm (KSA)
This is the pseudocode of the KSA:
1  for i from 0 to 255
2      S[i] := i
3  endfor
4  j := 0
5  for i from 0 to 255
6      j := (j + S[i] + key[i mod keylength]) mod 256
7      swap values of S[i] and S[j]
8  endfor
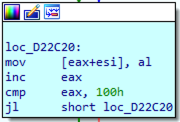
Figure 27 corresponds to lines 1 and 2: indeed, S[i] is assigned the value i, for i that ranges from 0 to 255 (100h is 255 in decimal).
In figure 28 we can see part of the initialization of the S array, where the memory is assigned consecutive values from 0 to 255.

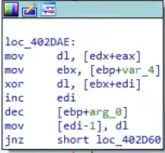
In figure 29 we can see that each character of the string is read, XORed with the S array, and written back to memory (corresponding to line 6)
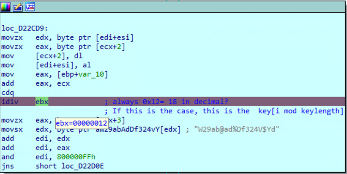
In figure 30 we can see a block that corresponds to key[i mod keylength]), indeed we see that a different char of the key is extracted based on the index,
modulus the length of the key, which is 18 (or 12 in hex)
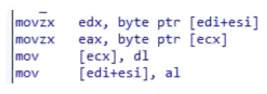
The swap operation (line 7) is shown in figure 31. EDX and EAX registers are used to temporarily store the values that are going to be swapped.
Pseudo-Random Generation Algorithm (PRGA)
IDA disassembles the PRGA in another block (KSA is implemented by function sub_D22C00, while PRGA is implemented by function sub_D22D40).
The pseudocode for PRGA is shown in figure 32:
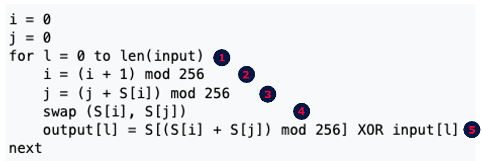
Now, I'll do my best to match each line of the pseudocode with the actual blocks shown in IDA:
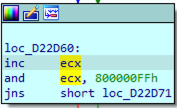
1. The loop iterates from the first char up to the last one. We can see this in figure 33, where the jump is taken (i.e.another iteration of the loop is repeated)
as soon as there are characters to decrypt
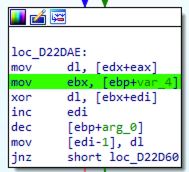
2. i is implemented using register ECX. It is incremented by one at each iteration and restarts from zero each time it reaches 256 (and ecx, 800000FFh)
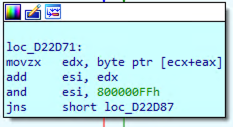
3. S[i] is implemented by the memory location at address [ecx + eax], j is implemented using register EDX and finally mod 256 is implemented
by the and operation
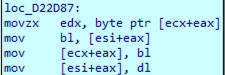
4. The swap of S[i] and S[j]
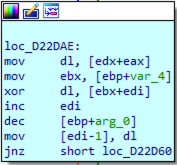
5. (S[i] + S[j]) mod 256
![S[i] + S[j] mod 256](/static/ef_app/images/analysis_of_encryption_algs_used_by_north_korean_group_lazarus/37.png)
The XOR between the ciphertext and the key is applied and the decrypted char is written back to memory
This concludes the encryption capabilities of this sample attributed to the North Korean Lazarus group.
Other functionalities are present, whose analysis is omitted because they are not related to the encryption capabilities of the sample.
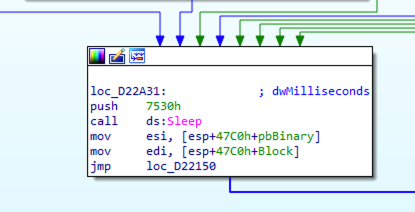
The only thing that I want to add is that this sample does not worry too much about hiding its tracks: once launched with the correct command-line argument,
it remains constantly running, executing a sleep of 0x7530 = 30.000 ms = 30 seconds when it is not communicating with the C2 server or doing other stuff.
Conclusion
We deeply analyzed a sample attributed by CISA to the Lazarus group, mainly focusing on its encryption capabilities.
We saw that the sample implements two custom encryption algorithms:
- the first one is a simple XOR-based encryption algorithm, used to communicate the information gathered about the infected system to the C2 server
- the second one is a custom implementation of the RC4 algorithm, a stream-based encryption algorithm used to decrypt the instructions received from the C2 server.
Although resources about this sample already exist (notably the one from CISA), the aim of this blog is to provide a much more detailed analysis about the encryption algorithms used by
the Lazarus group, analyzing them in depth and explaining all the relevant parts in the disassembled code.
Indicators of Compromise
You can refer to CISA IOCs (stix format).
References